Three-dimensional measuring technology has long since entered the industry. A maximum effort is being made to produce, for example, a miniaturised projection of components and accessories using the appropriate technology. 3D laser scanners are being used by automobile manufacturers and suppliers as well as in the aerospace industry, in foundries, in tool and mould manufacturing and in the electrical industry. The plastics industry is increasingly focusing on the capabilities of laser scanning.
Terrestrial laser scanning: Technology gaining ground
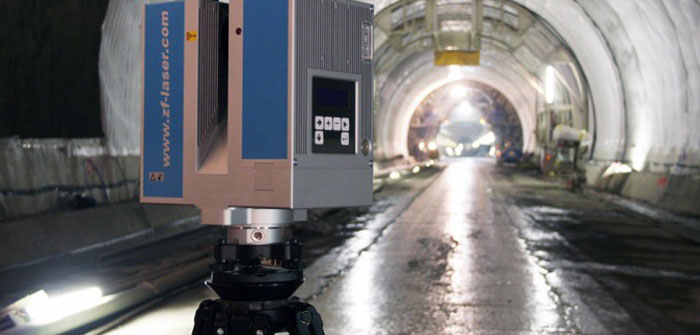
This is a technology that can be almost fully automated. The laser scanner is initially installed in a fixed position – although even very small mobile devices can be used for various applications. The measurements are made from this standpoint. The device emits a laser beam that strikes the object and is reflected back. It is thus not necessary to set up a reflector. The measured distances offer the possibility of calculating the coordinates that are processed by the system or special software and the individual data points are used to create the visualization of the object. Sections and views, CAD models and reliefs of the measured surfaces can thus be created.
Use of 3D laser scanners in the industry
In the industrial sector, there are many possibilities for using 3D laser scanners. The profiles of forged products can be measured for example. The primarily purpose in this case is to check the correctness of the profiles. They must be in compliance with DIN requirements. The 3D shapes are given their own measurement algorithm, which is created based on the captured profile data. The laser scanner operates here at maximum speed and provides the data immediately for analysis and visualisation.
The 3D laser scanner is also able to measure loose bearing seals. The bearings are turned for this purpose. The measurement speed in turn is very high, which significantly shortens the time required for measuring the bearing.
3D laser scanners are used in mechanical engineering and metal processing to measure steel sheets – more specifically the curvature of the steel sheets. This measurement determines how even the metal sheets are. They are guided past the measuring device at a high rate of speed. The measurements are made in short intervals with sampling rates of up to 64 kHz.
The measurement of welding seams is another area of industrial application where it is even possible to measure the welding seams on round or curved surfaces.
By using 3D laser scanners, it is possible to fulfil the requirements of different target groups better. It is always important to provide results as soon as possible and create various data models. Exact measurements enable the creation of very accurate documentation materials using various methods and types of software to process the data. Laser scanning is also periodically used for planning industrial as well as architectural applications.
Innovative documentation
The individual planes of a workpiece can be scanned and measured by terrestrial laser scanners. The respective parts can thus be displayed in three-dimensional format thereby giving project management new opportunities and perspectives. Many construction and accessory parts lack measurement or survey plans. This situation can be rectified by the simple procedures of laser scanning. Parts can be represented perfectly in CAD, which is the basis for the further processing of the workpieces.
This is what makes terrestrial laser scanning so special
Terrestrial laser scanning allows the measurement of objects without even coming in contact with them. Sensitive components or those that cannot be readily accessed can thus be measured and visualised later. Because there is no need for reflectors it is not necessary to install reference marks. Basically, working with a 3D-based laser scanner can be compared to working with a digital camera where a position is established and the point of view and image are subsequently selected. One can now zoom in on the object and then simply press the shutter release. Using a 3D laser scanner is thus no more complicated than taking photographs with a camera.
The workpieces or components shown can be displayed in their original size enabling a very realistic presentation. This is where laser scanning differs from photogrammetry, which is forced to reduce the size of the objects and thus define a smaller image matrix. In addition, only two dimensions of the measured parts are represented. Laser scanning produces no distortions and at the same time, the measurement is completed within in seconds. Several thousand data points can be measured and displayed per second.
A realistic picture of the object to be measured is created within a few minutes. It is thus always possible to measure the object in its entirety, even if only a few data points are available and used. If only a few data points are usable from a certain position because they perhaps overlap, the captured data are referenced. They are subjected to referencing in relation to each other or placed in a higher-level reference system. A high point density ensures that ultimately a complete object can be mapped.
A very precise picture is obtained despite the considerable speed of the measurement. Deviations in the measurement data range only in millimetres. This is what is known as measurement noise.
Measurement noise during scanning
The individual 3D laser scanner models offer a variety of distances from which they can measure. This means that some devices measure within a range of up to 1 metre, others are even able to measure workpieces or structures located at a distance of 100 metres. So-called measurement noise occurs the greater the distance from the object. The manufacturers specify for their laser scanners within which range deviations may occur. That is, some devices measure an object, which is 25 metres away with a maximum deviation accuracy of up to 2 millimetres. Other devices in contrast have a higher measurement noise with deviations of up to 5 millimetres. Hence, it is particularly important to use laser scanners with low measurement noise for industrial applications. However, devices designed only for short distances are primarily used here in any case. These devices are extremely accurate and have virtually no measurement noise.
Incidentally, modern laser scanners are also suitable for use in production halls and poorly lighted rooms. Even in complete darkness, laser scanners are able to deliver reliable images. The reason for this is that the laser beam is emitted and reflected by the object being measured. Only the received light is used for processing the data. This light is received under any lighting conditions and is not affected by the surrounding conditions prevailing at the location of the scanner.
Conclusion: The industrial sector offers many opportunities for using 3D laser scanners. These scanners operate with the highest accuracy and irrespective of the ambient conditions. They offer capabilities for detecting surface variations that could not be visualised using other measurement methods.
Terrestrial 3D laser scanners: market overview
The imaging and stationary 3D method using laser-based distance measurements is called terrestrial laser scanning. The automated sequence of scanning steps is always carried out at fixed intervals and also includes both horizontal and vertical information thereby creating a regular grid, which in turn enables two-dimensional recording of objects. Terrestrial laser scanning thus differs from other measurement methods.
Two different types of laser scanners are used: the camera field of view laser scanner, on the one hand, the panoramic field of vision laser scanner on the other. An overview of current manufacturers and their products is shown below.
1. Riegl: VZ400
The effective measurement rate of scanner is 125,000 points per second, which, according to the manufacturer, is a position accuracy of 5 millimetres at a distance of one hundred metres. A maximum range of 300 metres is possible. The reflexivity is 80%. The horizontal field of view is 360°; the vertical field of view is 100°. The device is fitted with a GPS receiver and a port for a GPS aerial. This is important for absolute orientation of the point cloud. Also integrated into the device are a timer for synchronisation with the GPS data and a tilt sensor. There are also bearing surfaces on the top, which can be used for high-precision fitting of an adapter for a high-resolution camera. The special feature of the VZ 400 is the detection of several objects with a laser pulse. The device is operated using a 3.5-inch TFT display.
2. Basis Software, Inc.: Surphaser 25HSX
The scan accuracy of this device is comparatively high at 800,000 points per second. The different versions of this laser scanner vary based on the range and accuracy. The various scanning distances are short range (0.5 to 5 m), intermediate range (0.8 to 16 m), medium range (1 to 27 m) and extended range (1.5 to 38 m). The Surphaser has been designed primarily for close-range industrial applications. It has a 360° horizontal and 270° vertical field of view. The device is operated with the help of a laptop and a USB interface, which is used for storing the data.
3. Callidus: CPW 8000
The scanning speed of this unit is 50,000 points per second; the range is up to 80 metres. The accuracy in the measurement over distances is 2 millimetres for a target at a distance of 30 metres. The horizontal field of view is about 360°; the vertical field of view is 300°. The scanner can be operated in ambient temperatures of between 10 and 50°C. In addition, the saved configuration file can be used independently. The data are stored on a USB flash drive. The unit is also equipped with Wi-Fi and Ethernet interfaces so that it can also be operated with a laptop. There is an integrated camera for selecting the scan range.
4. Faro: Photon 80 and 20
The Photon 80 and Photon 20 units vary range. The Photon 80 can be used for a range from 0.6 to 76 metres; the Photon 20 from 0.6 to 20 metres. The scanning speed is up to 120,000 points per second; the horizontal field of view is 360° and the vertical field of view is 320°. The laser scanner can be used as stand-alone system and can store the collected data on an integrated 80-gigabyte hard drive. The laser scanner can also be controlled via Ethernet and Wi-Fi. An optionally available high-resolution camera enables photogrammetric applications, which are combined with laser scanning.
5. Zoller + Fröhlich: Imager 5006i
This widely used 5006 laser scanner served as the basis for the further development of the 5006i scanner. New here is the wi-fi interface, which the predecessor model does not yet have. There is also the possibility of combining a high-resolution digital camera with the laser. Advantageous is above all the low measurement noise. Another positive item worth mentioning is a wide temperature range at which the laser scanner can be operated. The maximum scanning speed of this unit is 506,000 points per second; specifications show a range of up to 79 metres.
The previously mentioned measurement noise applies to a distance from the target of 25 metres and a specified 20% reflexivity of the surface of 2.5 mm. The horizontal field of view is 360°; the vertical field of view is 310°. The unit is operated with the help of an integrated display, which makes it a standalone scanner. The data can be stored on the 60 GB hard drive integrated into the laser scanner. Data can be stored externally, however, via the USB port. The laser scanner can also be controlled and data read via Ethernet and wi-fi interfaces.
The manufacturer offers various options for the application of a high-resolution camera that can be operated together with the scanner. A motorised camera is available for real-time colouring of the point cloud.
6. Site: 4400 LR
The 4400 LR offers a speed of 4,400 points per second; the range is up to 700 metres. The horizontal field of view is specified at 360° and 80° for the vertical field of view. An object 700 metres away can be measured with an accuracy of 50 millimetres. The unit is controlled by an externally connected handheld controller. The connection is made via Ethernet. A GPS receiver can also be connected. A 37-mega pixel camera is already integrated, which allows colouring of the point cloud.
7. Leica: ScanStation 2
The range of this 3D laser scanner is 300 metres; the scan rate is up to 50,000 points per second. The Leica ScanStation 2 is capable of a range accuracy of 4 millimetres at a distance of more than 50 metres. The manufacturer specifies the horizontal field of view at 360° and 270° for the vertical field of view. The unit is operated via a laptop, which is connected via an Ethernet interface to the laser scanner.
Another model is the HDS 6000, which, although initially developed by the Zoller + Fröhlich, is a member of the Leica Geosystems family of products. The device is similar in design to the Imager 5006. The maximum range of this unit is 79 metres; the maximum speed about 500,000 points per second.
The accuracy over a distance of 25 metres to a target with a 90% surface reflexivity is 4 millimetres. The horizontal field of view is 360°; the vertical field of view is 310°. The scanner can be used independently and is operated via the integrated display. Remote control is also possible using Bluetooth technology. The unit can also be operated using a laptop via this interface. The device can be operated for about one and a half hours thanks to the integrated lithium-ion batteries, which have now become established in almost all 3D laser scanners. The power consumption is 50 watts. A battery life of up to 4 hours is possible using external batteries.
Photo credits: © Zoller + Fröhlich GmbH


